How to Quickly Index Your Site in Google
A lot of the time when you're buying an expired domain, you'll find that the site isn't indexed (unless you buy one of our domains, which we guarantee will get indexed).
Is this reason enough to pass on the site and move on? No way.
Sure, there are some cases when you'll do everything right and the site still won't come back, but we're finding that those are few and far between, especially if you've determined the domain is clean by doing a proper spam check.
Rather than walk away from a site that isn't indexed, you can register the domain and follow the steps below. Worst case scenario, you lost the $2-$12 you spent registering it (depending on your registrar and coupon-hunting abilities). Best case scenario, you re-index a high quality domain that other people have passed over because they didn't know how to quickly get it indexed.
This method can be used to:
- Re-index expired domains
- Update the metas on an indexed high-metric domain
- Index a new domain
- Index a new post or page or an indexed domain.
Step 1: Check to See if the Site (or Page/Post) is Indexed
Go to Google and type in
site:YourExpiredDomain.com
where YourExpiredDomain.com is the URL of the site you're looking for.
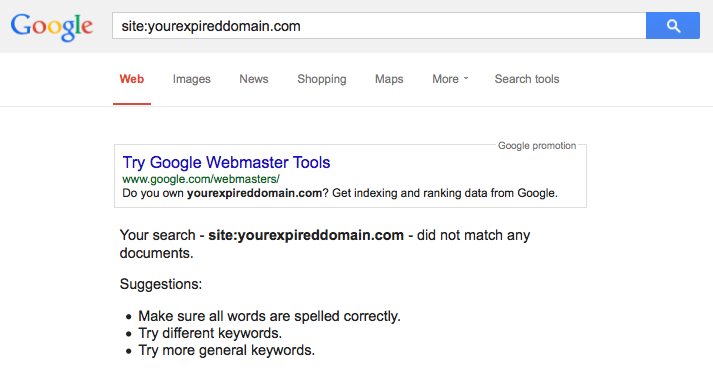
If the site is not indexed, it will look like this:

If this shows up, your site is not indexed. If you've done a thorough check and are convinced the site is clean and spam-free, and you want to take a gamble and buy it, move on to the next steps to get it indexed.
Step 2: Buy the Domain, Set Up Hosting, and Install WordPress
Go to your favorite registrar and buy the domain name. Set up hosting (click here to read our Hosting How-To), and install a fresh copy of WordPress.
Step 3: Install the Google XML Sitemap for Videos Plugin
Log into WordPress, go to Plugins, and click Add New.
Search for Google XML Sitemap For Videos, and install it.
Step 4: Create a Post
Assuming you left the standard WordPress settings alone, you'll have recent posts displaying on the home page. All you need to do is add a new post, the content of which we will cover in the next step.
Just a quick note here. I like to delete the Hello World post and the Sample Page, just in case Google picks up on those, too, I don't care to have them indexed. It's not a big deal, but I will spend a couple of minutes setting up WordPress a little bit before this, because that way I can have the site indexed with the proper set up right away.
I will usually go in and install All In One SEO Pack, Yoast, or another SEO plugin, then update my title and description. I'll also delete the dummy post/page WordPress starts you with. That way, when the domain gets indexed, I get the right metas showing up right away.
This isn't necessary, and if you'd rather spend 2 minutes rather than 5, you don't need to to this stuff.
Step 5: Embed a Youtube Video in the Post
Go to Youtube, find a video (any video), click Share, then Embed, and copy the standard embed code.
Go back to the Post you just made, go into the Text Editor, and paste the embed code.
If you want, you can always add a sentence about how the site is coming soon, and in the meantime, have a look at this great video.
Publish/Update the page.
Step 6: Create a Video Sitemap
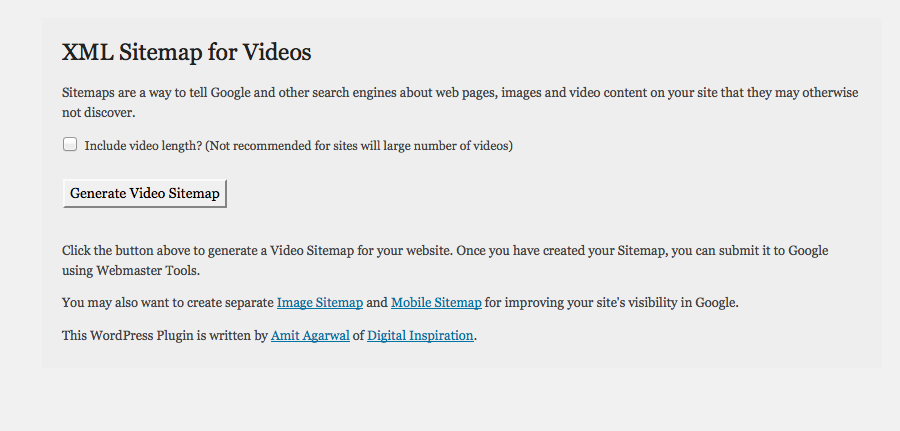
You'll find the Video Sitemap Plugin we just downloaded under the Tools section in WordPress. It will show up as Video Sitemap. Click on that and you'll be taken to the main Plugin page, which looks like this:

Click on Generate Video Sitemap.
It will tell you that the video sitemap was created successfully, and give you the option to “ping Google”.
Click the link that says “ping Google”.
You'll be taken to a standard HTML page from Google that basically says they've received your sitemap and they'll have a look for it.
Step 7: Check Your URL in Google Again
We've seen this method re-index sites in SECONDS, but sometimes you have to wait a few minutes. Usually it's very quick, but if you want to be extra sure before pulling the plug, wait 24 hours and check.
Go to Google and type in:
site:YourExpiredDomain.com
If the site is healthy and just needed the little defibrillator blast we gave it to get its heart going again, you'll see it in Google, re-indexed and ready to do battle.
About the Author pbnhq.com
We strive to make PBNHQ a complete one-stop-shop for everything PBN related. Together we are showing SEO agencies and SEO practitioners not only HOW to rank their clients sites, but also providing essential tools and services that facilitate them reaching the first page of Google.

